Savory Cheddar Jalapeño Scones

Recipe ByAshley |
UpdatedApril 7, 2026 |
Comments
This Post May Contain Affiliate Links. Please Read Our Disclosure Policy
Hey friends! Ashley here. So picture this: it’s Saturday morning, the kids are still in their pajamas, and everyone wants something warm and comforting — but I do not want to spend an hour in the kitchen. That’s exactly when I reach for my go-to recipe for Savory Cheddar Jalapeño Scones — flaky, cheesy, perfectly spiced, and ready in under 35 minutes with zero mixer required. These bad boys are about to become a permanent fixture on your weekend breakfast rotation, I promise. Ready? Let’s go!
Why You’ll Love These Savory Cheddar Jalapeño Scones
If you’ve never made scones from scratch before, these cheddar jalapeño scones are going to completely change your baking game — and I say that with my whole chest!
- No Mixer Required: These scones are 100% hands-on in the best possible way. You use your fingers to work the butter into the flour, which means less equipment to wash and more tactile fun in the kitchen. My kids love helping with this step — little hands were honestly made for this!
- Ready in Under 35 Minutes: From mixing bowl to oven to table in under 35 minutes flat. That’s weekend brunch magic right there — no yeast, no proofing time, no waiting around. Just mix, shape, and bake your way to something absolutely incredible.
- Bold, Bakery-Worthy Flavor: Sharp cheddar, diced jalapeño, garlic powder, and dried thyme — the flavor combination in these scones tastes like something straight out of a fancy artisan bakery. But we made them in our pajamas at 9am, so that’s an automatic win in my book.
- Customizable Heat Level: Love spice? Load up the jalapeños. Feeding little ones or spice-sensitive folks? Dial it back to just a tablespoon or skip it entirely. This recipe is flexible and forgiving — my imperfectly perfect kind of baking, y’all.
- Perfect for Any Occasion: Serve them warm alongside breakfast, a steaming bowl of soup, or as a savory party appetizer with softened butter. These scones work for every meal, every crowd, and every season — and they always disappear from the tray embarrassingly fast!
One batch is truly never enough — do yourself a favor and make a double from the start!
Ingredient Spotlight: Cheddar Cheese & Jalapeños
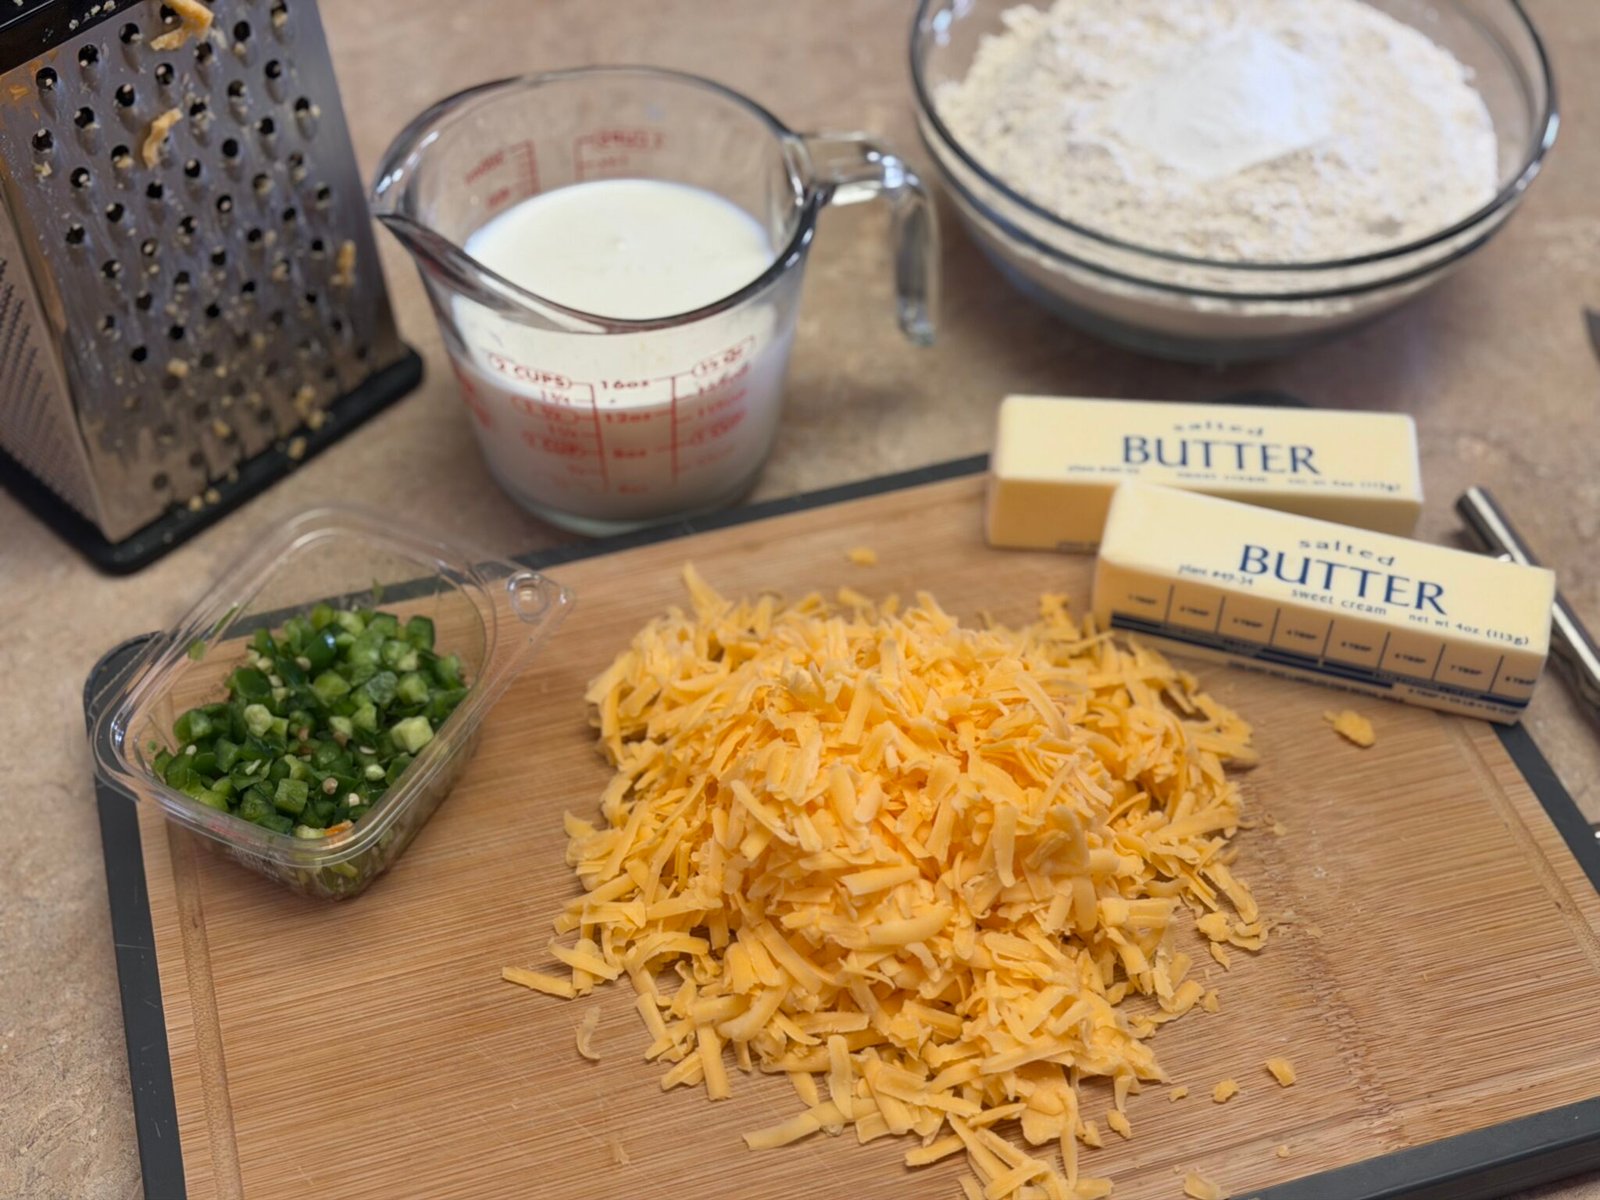
Sharp cheddar is the real star of these Savory Cheddar Jalapeño Scones, and the quality genuinely matters here. Go for a sharp or extra-sharp cheddar block and shred it yourself — pre-shredded cheese has anti-caking agents that affect how it melts and integrates into the dough. Freshly shredded cheddar creates gorgeous cheesy pockets throughout every wedge and delivers that rich, tangy flavor in every single bite.
Now let’s talk jalapeños! Fresh jalapeños are my first choice — dice them small so you get a little kick in every bite without any one piece being overwhelming. Not feeling the heat today? Pickled jalapeños from a jar are a fantastic milder swap and add a subtle tanginess that plays beautifully with the cheddar. You can also seed the fresh jalapeños first if your crew is on the sensitive side — this recipe adapts to every spice comfort level.
The secret to flaky scones is all about cold butter. Keeping those butter pieces cold means they create little steam pockets as they bake — and that is exactly what gives scones their beautiful layered, flaky texture. My favorite trick? Grate your cold butter on a box grater directly into the flour. It distributes faster, you barely have to work it in with your hands, and you dramatically reduce the risk of warming it up too much.
Buttermilk brings just the right amount of tang and acidity to keep these scones tender and perfectly light. Don’t have buttermilk on hand? No worries at all — make a quick DIY version by adding 1 tablespoon of white vinegar or lemon juice to ¾ cup of whole milk. Stir it, let it sit for 5 minutes, and you’re good to go. Future-you will thank you for knowing this simple little trick!
Let’s Make Savory Cheddar Jalapeño Scones Step-by-Step
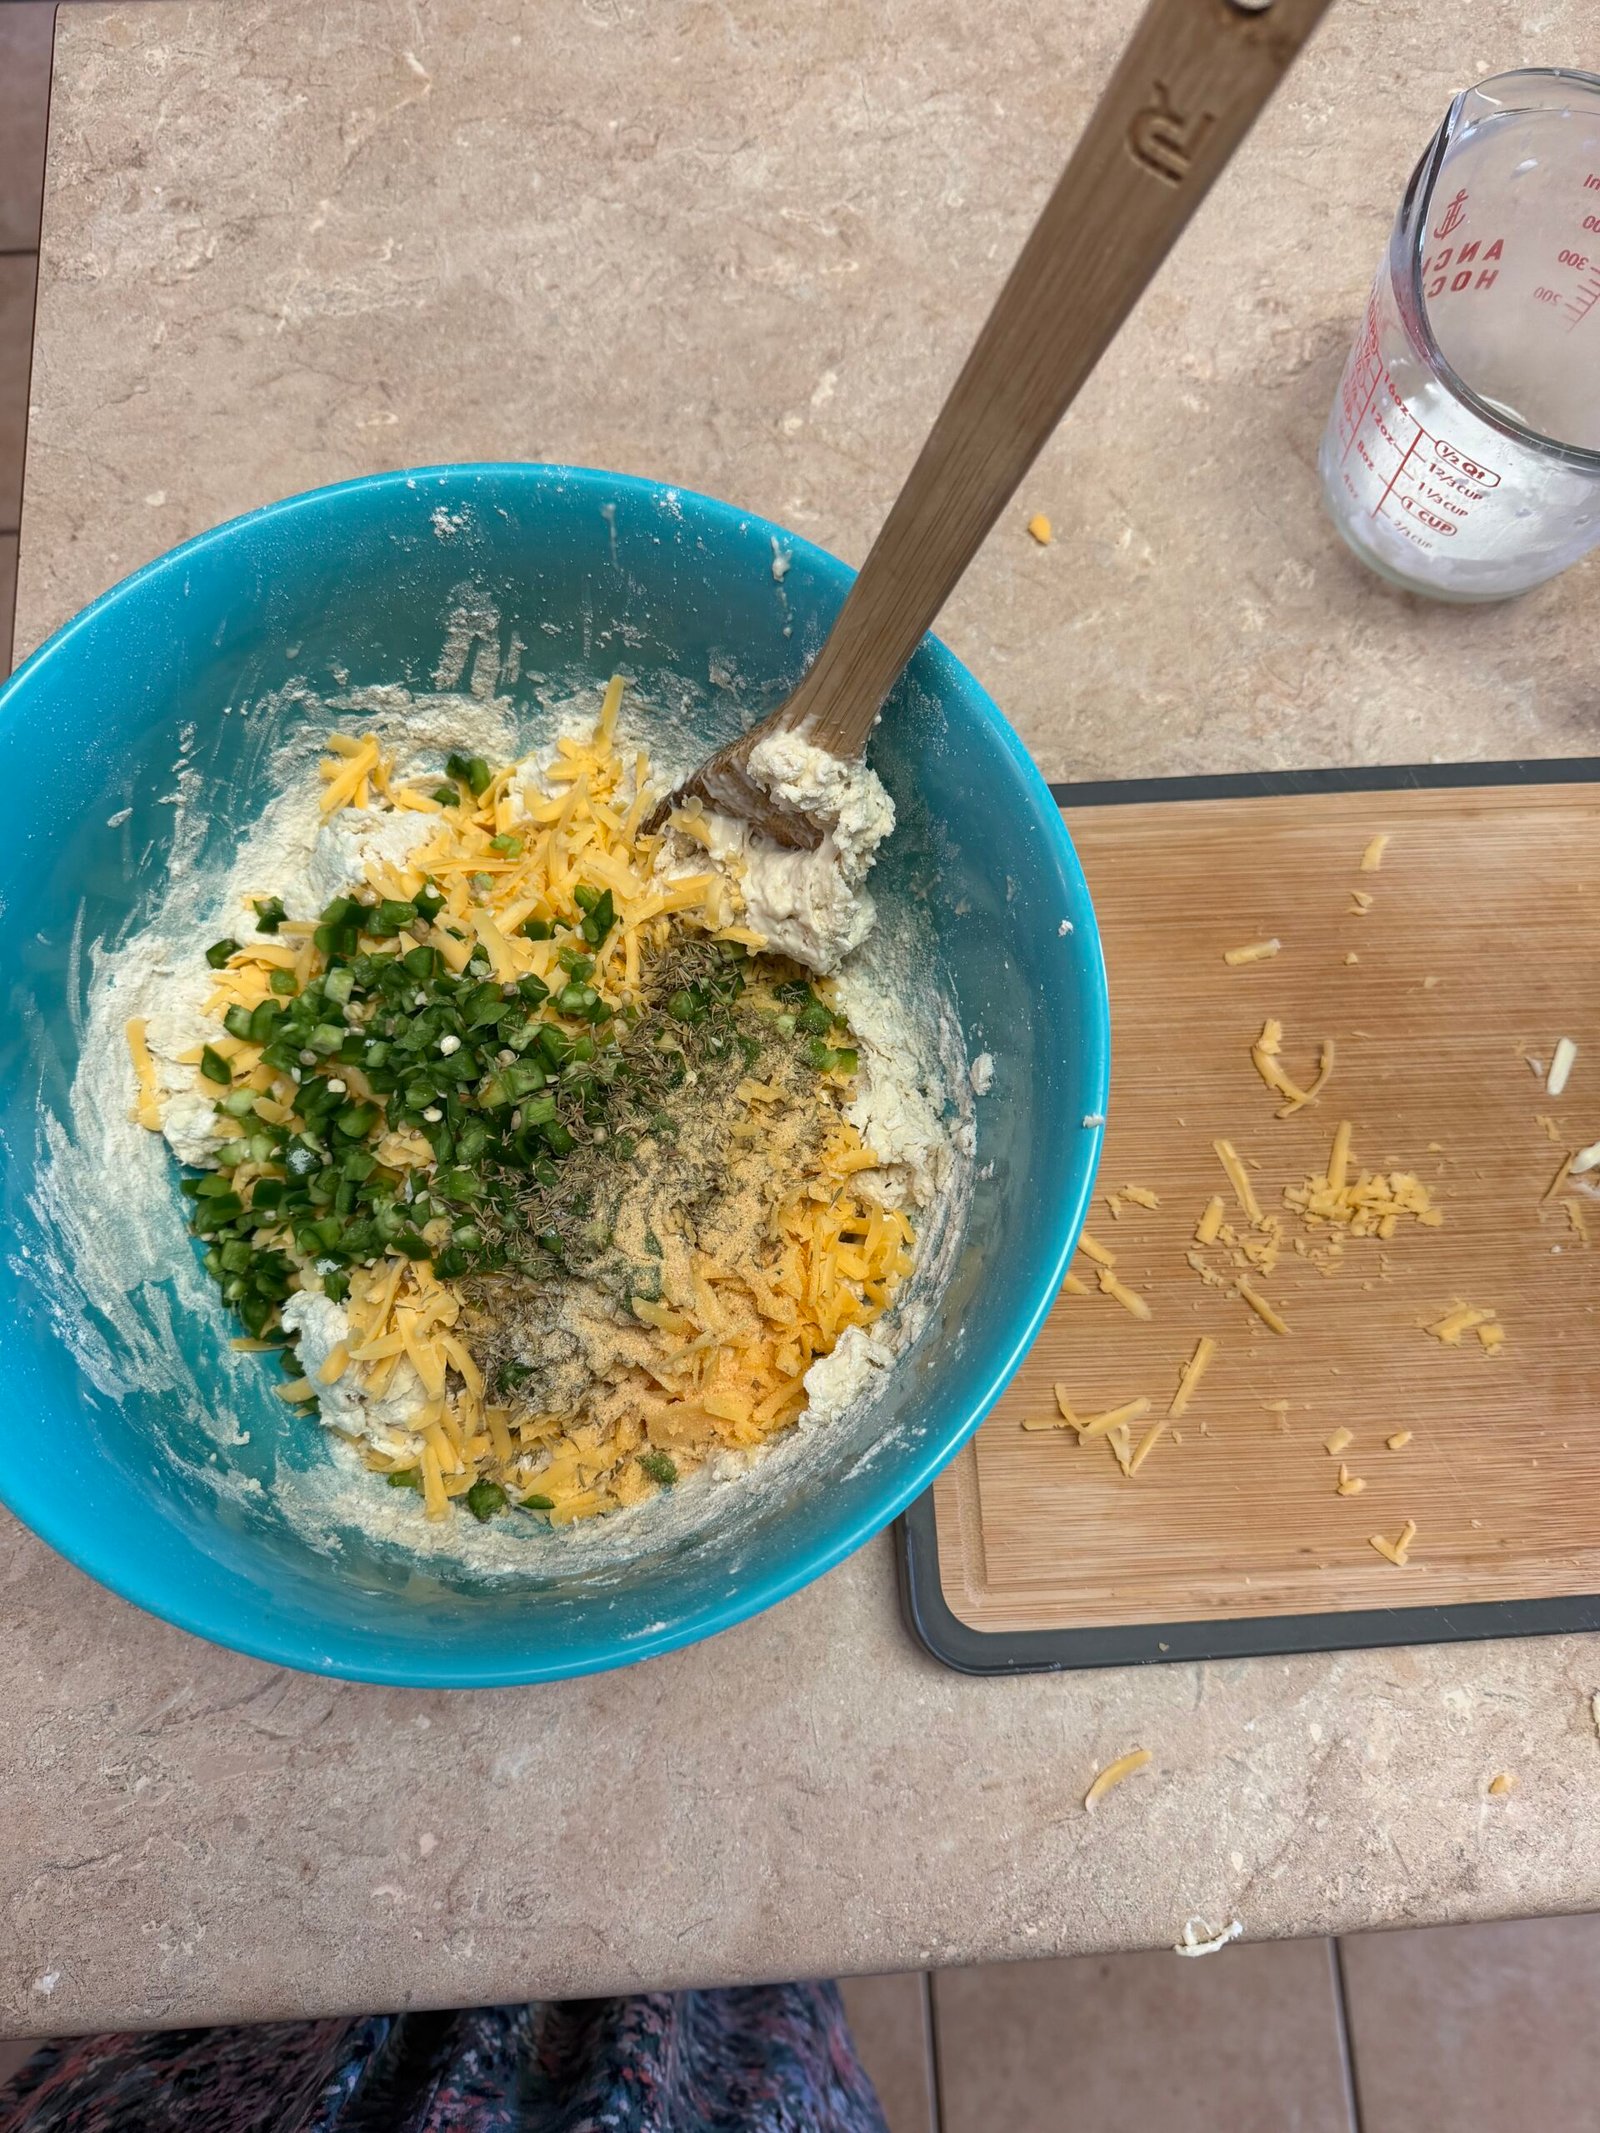
- Combine Your Dry Ingredients: In a large mixing bowl, whisk together the flour, baking powder, baking soda, garlic powder, salt, and dried thyme. Give everything a thorough mix so the leaveners and spices are evenly distributed throughout the flour before you add anything else — this sets you up for success!
- Work In the Cold Butter: Add your cold diced or grated butter to the flour mixture. Using your fingertips, quickly pinch and rub the butter into the flour until the mixture resembles coarse crumbs with some pea-sized butter pieces still visible. Speed matters here — you don’t want the heat of your hands to melt those butter pieces. Remember: cold butter equals flaky scones!
- Add the Buttermilk, Cheese, and Jalapeños: Pour in the cold buttermilk, then fold in the shredded cheddar cheese and diced jalapeños. Stir and fold until JUST combined — a few dry streaks in the dough are completely okay! Overmixing is the number one scone mistake, so the moment the dough comes together, stop and step away from the bowl.
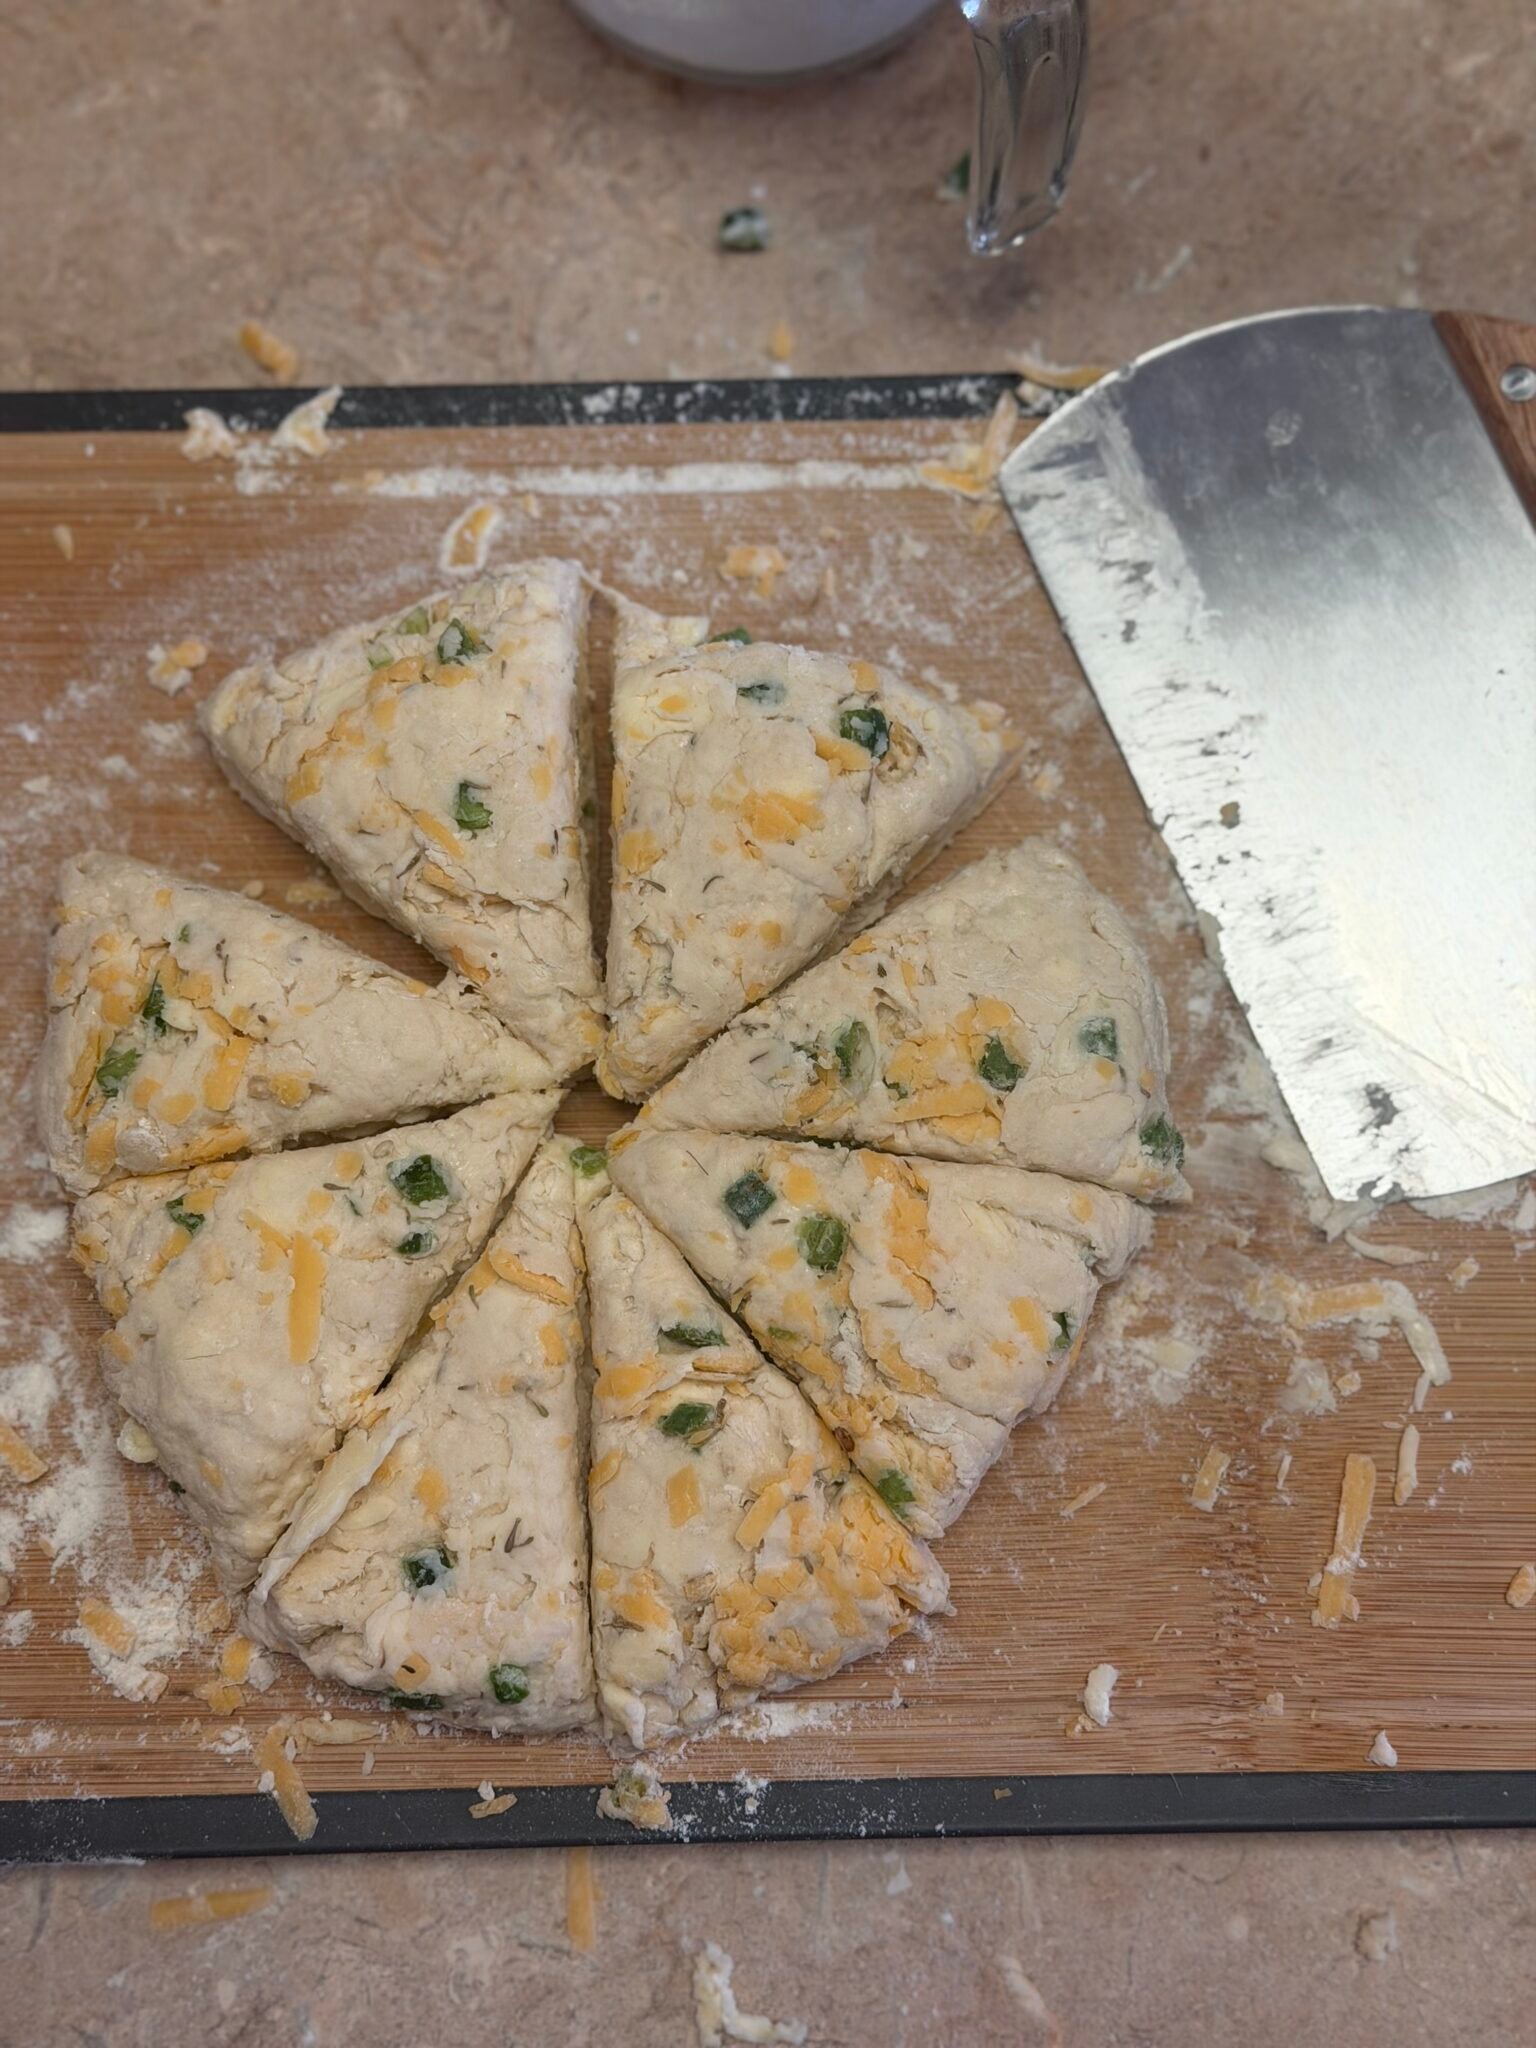
- Shape and Cut Into Wedges: Turn the dough out onto a lightly floured work surface. Gently pat it with your hands into a circle about 1 inch thick — don’t reach for a rolling pin, just use your palms. Using a sharp knife or bench scraper, cut the circle into 8 even wedges just like you’re slicing a pie. Handle the dough as little as possible throughout this entire step.
- Bake to Golden Perfection: Place the scone wedges on a parchment-lined baking sheet with a little space between each one. Bake at 400°F for 20–25 minutes until the tops are beautifully golden brown and the bottoms have a gorgeous caramelized crust. Let them cool for at least 5 minutes before serving — the insides finish setting during that rest time. If you can wait that long, that is!
Ashley’s Pro-Tips for Perfect Scones Every Time
Keep everything cold — this is the golden rule of scone-making. Cold butter, cold buttermilk, and even chilled hands if your kitchen runs warm. Heat is the enemy of a flaky scone. If your kitchen is particularly warm that day, pop your flour mixture in the freezer for 10 minutes before adding the butter. This step is non-negotiable!
Grate your butter instead of dicing it. I learned this trick a few years ago and have never looked back. Take your cold butter stick straight from the fridge (or even the freezer) and grate it directly into the flour using a box grater. It distributes far more evenly, you barely need to work it in at all, and the risk of melting it with your warm hands is dramatically lower. Future-you will absolutely thank you for this one.
Don’t overmix — I cannot stress this enough! Overmixed scone dough develops too much gluten and you’ll end up with dense, tough little pucks instead of light, flaky wedges. The moment the dough just barely comes together — even if it looks a little rough and shaggy — stop mixing. That imperfectly perfect, slightly scraggly dough is exactly what you’re going for.
Use a sharp knife for clean, decisive cuts. A dull blade will drag and compress the dough layers instead of slicing cleanly through them, which can seal the edges and prevent a beautiful rise. A sharp chef’s knife or a metal bench scraper is your best tool for getting those gorgeous, lofty, open-crumbed wedges every single time.
Brush the tops before baking for that bakery-level finish. Right before the scones go into the oven, give the tops a quick brush of buttermilk or a whisked egg. This 10-second step gives you that deep, rich golden-brown color that makes them look like they came straight from a professional bakery counter. It makes all the difference — trust me on this one!
Storing & Making Ahead Your Cheddar Jalapeño Scones
These scones are absolutely best the day they’re made — warm and fresh out of the oven is the dream scenario! But leftovers store well in an airtight container at room temperature for up to 2 days. To reheat, pop them in a 350°F oven for 5–8 minutes or the microwave for 20–30 seconds. They won’t be quite as flaky as day-one fresh, but they are still incredibly satisfying — especially split in half and lightly toasted.
For freezer storage, these scones are excellent candidates! Let them cool completely after baking, then wrap each one individually in plastic wrap and place them all in a zip-top freezer bag. They keep beautifully for up to 3 months. To reheat from frozen, place directly on a baking sheet in a 350°F oven for 10–15 minutes. It’s like having a fresh-baked bakery treat on demand — basically a freezer bakery in your own home, y’all.
Make-ahead tip: You can prep the scone dough all the way through the shaping and cutting step, then refrigerate the unbaked wedges on a parchment-lined baking sheet overnight. In the morning, pull them straight from the fridge directly into the preheated oven — no need to bring them to room temperature first. Just add 2–3 extra minutes to the bake time. This is an absolute game-changer for holiday mornings, weekend brunch gatherings, or any morning when you want to feel like you have it completely together!
A Little Joy on Top
Y’all, the joy of pulling a tray of golden, cheesy, jalapeño-speckled scones out of the oven on a lazy Saturday morning is something I genuinely look forward to every time I make them. The smell alone — that warm cheddar and savory thyme — is basically the world’s best alarm clock. My kids come running every single time. Serve them warm with a generous pat of softened salted butter, and if you’re feeling a little fancy, a drizzle of hot honey over the top takes these from amazing to genuinely unforgettable.
These Savory Cheddar Jalapeño Scones pair beautifully with a cozy bowl of tomato soup, chicken chili, or a full plate of scrambled eggs for a complete weekend brunch spread. I’ve also been known to split one in half and tuck in a fried egg with a little extra sharp cheddar for the most incredible breakfast sandwich you’ve ever had — yes, it is exactly as good as it sounds. The whole family devours them every time, including my pickiest eater, and that is basically the highest compliment any recipe can receive in my house!
If you’re on a weekend baking roll (and honestly, same!), you absolutely have to try my Easy Fluffy Sourdough German Pancakes — pillowy, golden, and just as simple to pull together on a Saturday morning. And sweet-and-savory fans, you seriously NEED a jar of my Easy Slow Cooker Apple Butter — slather it on a warm scone and tell me that’s not a little slice of heaven. When the savory baking is done and it’s time for something sweet, my Easy Homemade Brownies are always the perfect pantry-staple finish to any bake day!
From my kitchen to yours — I genuinely hope these scones bring a little extra warmth and joy to your table this weekend. If you make them, drop a comment below or tag me in your photo — seeing your bakes truly makes my whole day. Happy baking, friends! — Ashley
Want to Save This Recipe?
Enter your email below, and we’ll send the link straight to your inbox.
Savory Cheddar Jalapeño Scones Recipe
Ingredients
Method
- In a large mixing bowl, whisk together the flour, baking powder, baking soda, garlic powder, salt, and dried thyme until evenly combined.
- Add cold diced or grated butter to the flour mixture. Work quickly with your fingertips, pinching and rubbing until the mixture resembles coarse crumbs with some pea-sized butter pieces still visible.
- Pour in the buttermilk, then fold in the shredded cheddar cheese and diced jalapeños. Mix until JUST combined — a few dry streaks are okay. Do not overmix.
- Turn dough onto a lightly floured surface and gently pat into a circle about 1 inch thick. Using a sharp knife or bench scraper, cut into 8 wedges like slicing a pie.
- Place wedges on a parchment-lined baking sheet and bake at 400°F for 20–25 minutes, until the tops are golden brown and the bottoms are nicely caramelized. Cool for at least 5 minutes before serving.
Tried this recipe?
Let us know how it was!
Meet Ashleybakeseasy
Welcome to Ashley Bakes Easy! I’m Ashley, a home cook and mother who believes that delicious food doesn’t have to be complicated. My journey in the kitchen started with a simple goal: create meals that my whole family would love, we could afford on a single income, and create recipes tailored for our special needs son Winston.
LET’S CONNECT!

Hello Form Ashleybakeseasy
Welcome to Ashley Bakes Easy! I’m Ashley, a home cook and mother who believes that delicious food doesn’t have to be complicated. My journey in the kitchen started with a simple goal: create meals that my whole family would love, we could afford on a single income, and create recipes tailored for our special needs son Winston.
Leave a Reply