Fresh Milled Flour Wheat Thins

Recipe ByAshley |
UpdatedApril 7, 2026 |
Comments
This Post May Contain Affiliate Links. Please Read Our Disclosure Policy
Hey friends! Ashley here. You know that moment when you’re standing in your kitchen with freshly milled flour on your hands and you just know something amazing is about to happen? That was me the very first time I made these fresh milled flour wheat thins — and y’all, my family demolished the entire batch before they were even fully cool! These buttery, golden, crispy little crackers are made with just a handful of real ingredients, and that freshly milled soft white wheat flour gives them the most incredible wholesome, nutty flavor you simply cannot get from a box. Ready? Let’s go!
Why You’ll Love These Fresh Milled Flour Wheat Thins
These homemade wheat thins check every single box — they’re simple, wholesome, and genuinely better than anything you’ll find at the store. Here’s exactly why my family is obsessed:
- Made with Real, Wholesome Ingredients: These crackers are made with freshly milled soft white wheat flour, real butter, and minimal pantry staples. You know exactly what’s in every crispy bite, and there’s not a single unpronounceable ingredient in sight. That feels really good, doesn’t it?
- Incredibly Easy to Make: Don’t let the homemade label intimidate you! The dough comes together in minutes with a bowl and a pastry cutter. The hardest part is waiting for it to chill — and even that is mostly hands-off time you can spend on everything else on your to-do list.
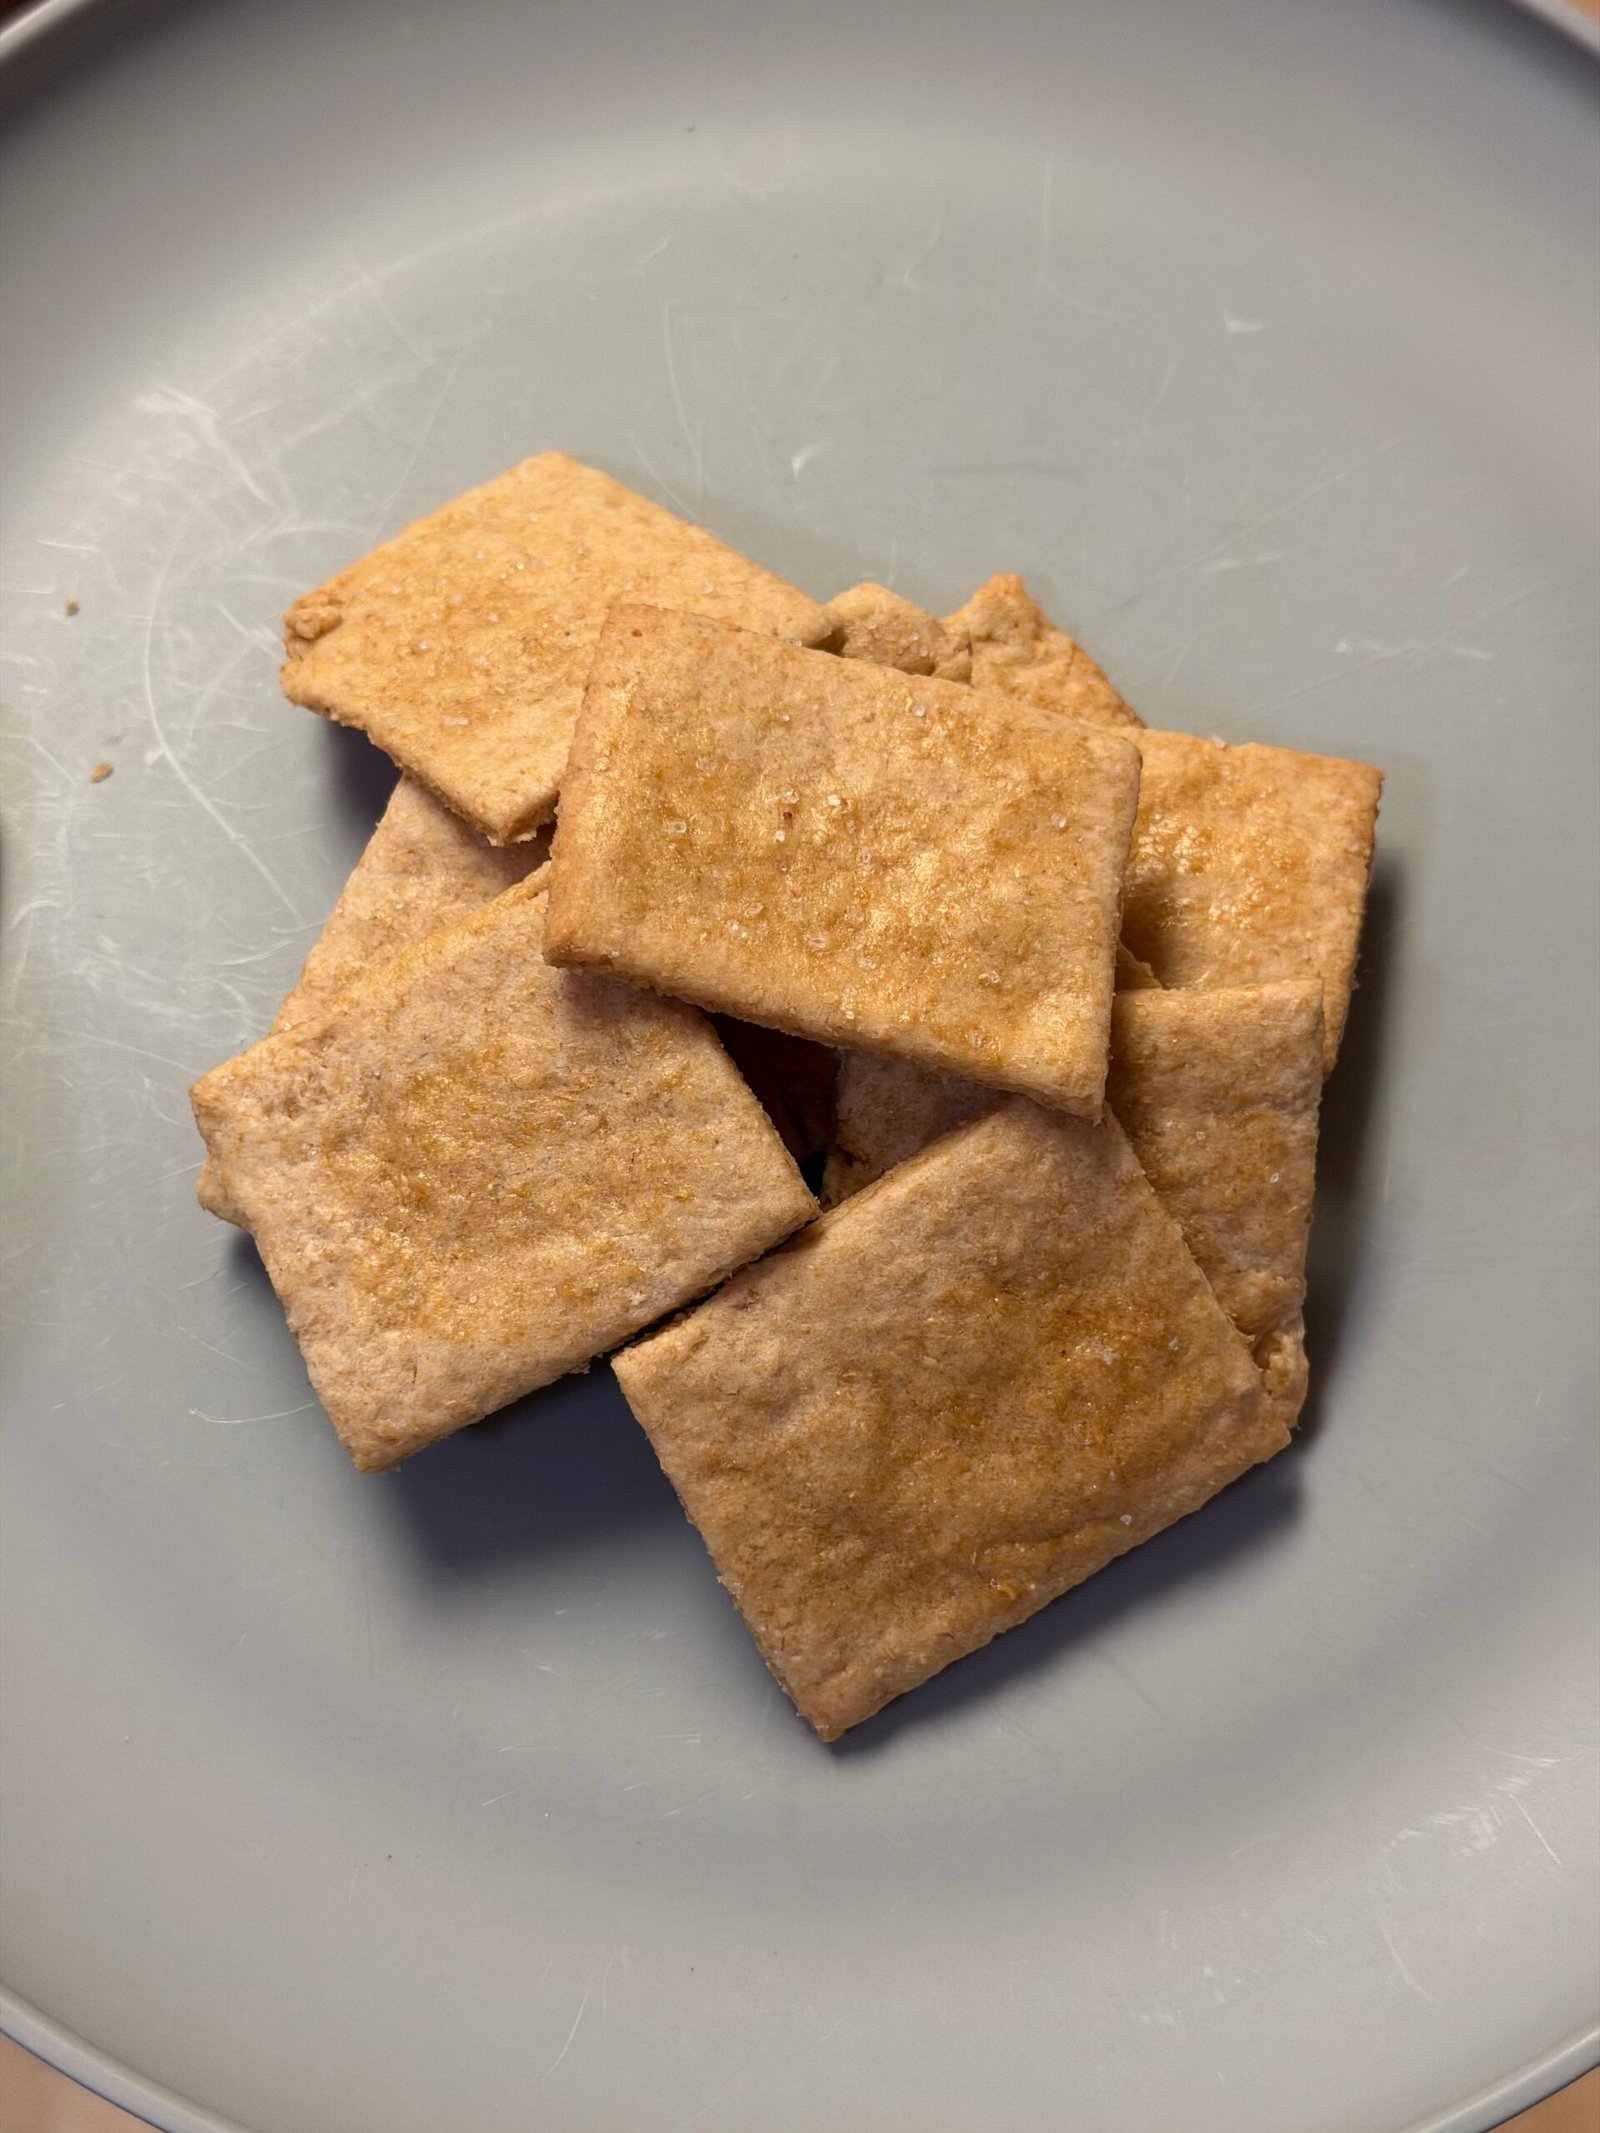
- Perfectly Crispy and Buttery: That egg wash and melted butter finish creates crackers with a gorgeous golden color and a satisfying crunch in every single bite. They’re the kind of cracker that makes you reach back into the bowl ‘just one more time’ — over and over again!
- Perfect for Snacking, Charcuterie, and More: These wheat thins are the perfect vehicle for cheese, dips, hummus, or a swipe of homemade apple butter. They look so elegant on a charcuterie board that guests will never believe you made them yourself in your own kitchen.
- Make-Ahead Friendly: The dough chills beautifully in the fridge, and the baked crackers store wonderfully in an airtight container for days. Bake a big batch on the weekend and future-you will have wholesome snacks on hand all week long!
Once you make these at home, y’all, going back to the store-bought box just won’t feel the same.
Ingredient Spotlight: Freshly Milled Soft White Wheat Flour & Cold Butter
The real star of these crackers is the freshly milled soft white wheat flour. Soft white wheat is lower in protein than hard red or hard white wheat, which means it produces a more tender, delicate crumb — perfect for crackers, pastries, and biscuits. When you mill it fresh, you preserve all the natural oils, flavor, and nutrition that commercial processing strips away. The result is a cracker with genuine depth of flavor that you simply cannot replicate with all-purpose flour from a bag.
If you’re new to fresh milling, don’t be intimidated! You’ll want your flour finely milled for this recipe — run it through your grain mill on the finest setting. Fresh-milled flour behaves a little differently than commercial flour: it’s more absorbent, more flavorful, and more nutritious. The dough may feel slightly different than what you’re used to, but trust the process and you’ll be rewarded with something truly imperfectly perfect!
The other unsung hero here is cold butter. We’re cutting cold, cubed butter into the flour the same way you would for pie crust or biscuits — working quickly so the butter stays in small, pea-sized pieces. Those little butter pockets are what create layers and that satisfying snap in the finished cracker. If your butter starts to warm up, pop the bowl in the freezer for 5 minutes before continuing. Cold is key — this step is non-negotiable!
As for the water, add it gradually — start with ⅓ cup and only add the remaining tablespoons if the dough needs it. You want a wet but manageable dough that holds together without being sticky. Over-watering will make rolling difficult and result in a denser cracker. The refrigeration step is essential: it firms everything up and makes the dough much easier to roll paper-thin.
Let’s Make Fresh Milled Flour Wheat Thins Step-by-Step
- Mix Your Dry Ingredients: In a medium bowl, whisk together the freshly milled soft white wheat flour, baking powder, sugar (or maple sugar!), and salt until evenly combined.
- Cut In the Cold Butter: Add the cold, cubed butter to the flour mixture. Use a pastry cutter or fork to cut the butter into the flour until the mixture resembles small peas. Work quickly to keep everything cold!
- Add the Water: Add ⅓ cup water and stir to combine. If the dough still has dry flour, add the remaining 2 tablespoons water a little at a time. The dough should be wet and cohesive but not sticky, with no dry flour remaining.
- Chill the Dough: Shape the dough into a disc, wrap it tightly in plastic wrap, and refrigerate for 1–2 hours until cold and noticeably firmer. Don’t skip this step — it makes all the difference for rolling!
- Preheat the Oven: When ready to bake, preheat your oven to 400°F and line a baking sheet with parchment paper.
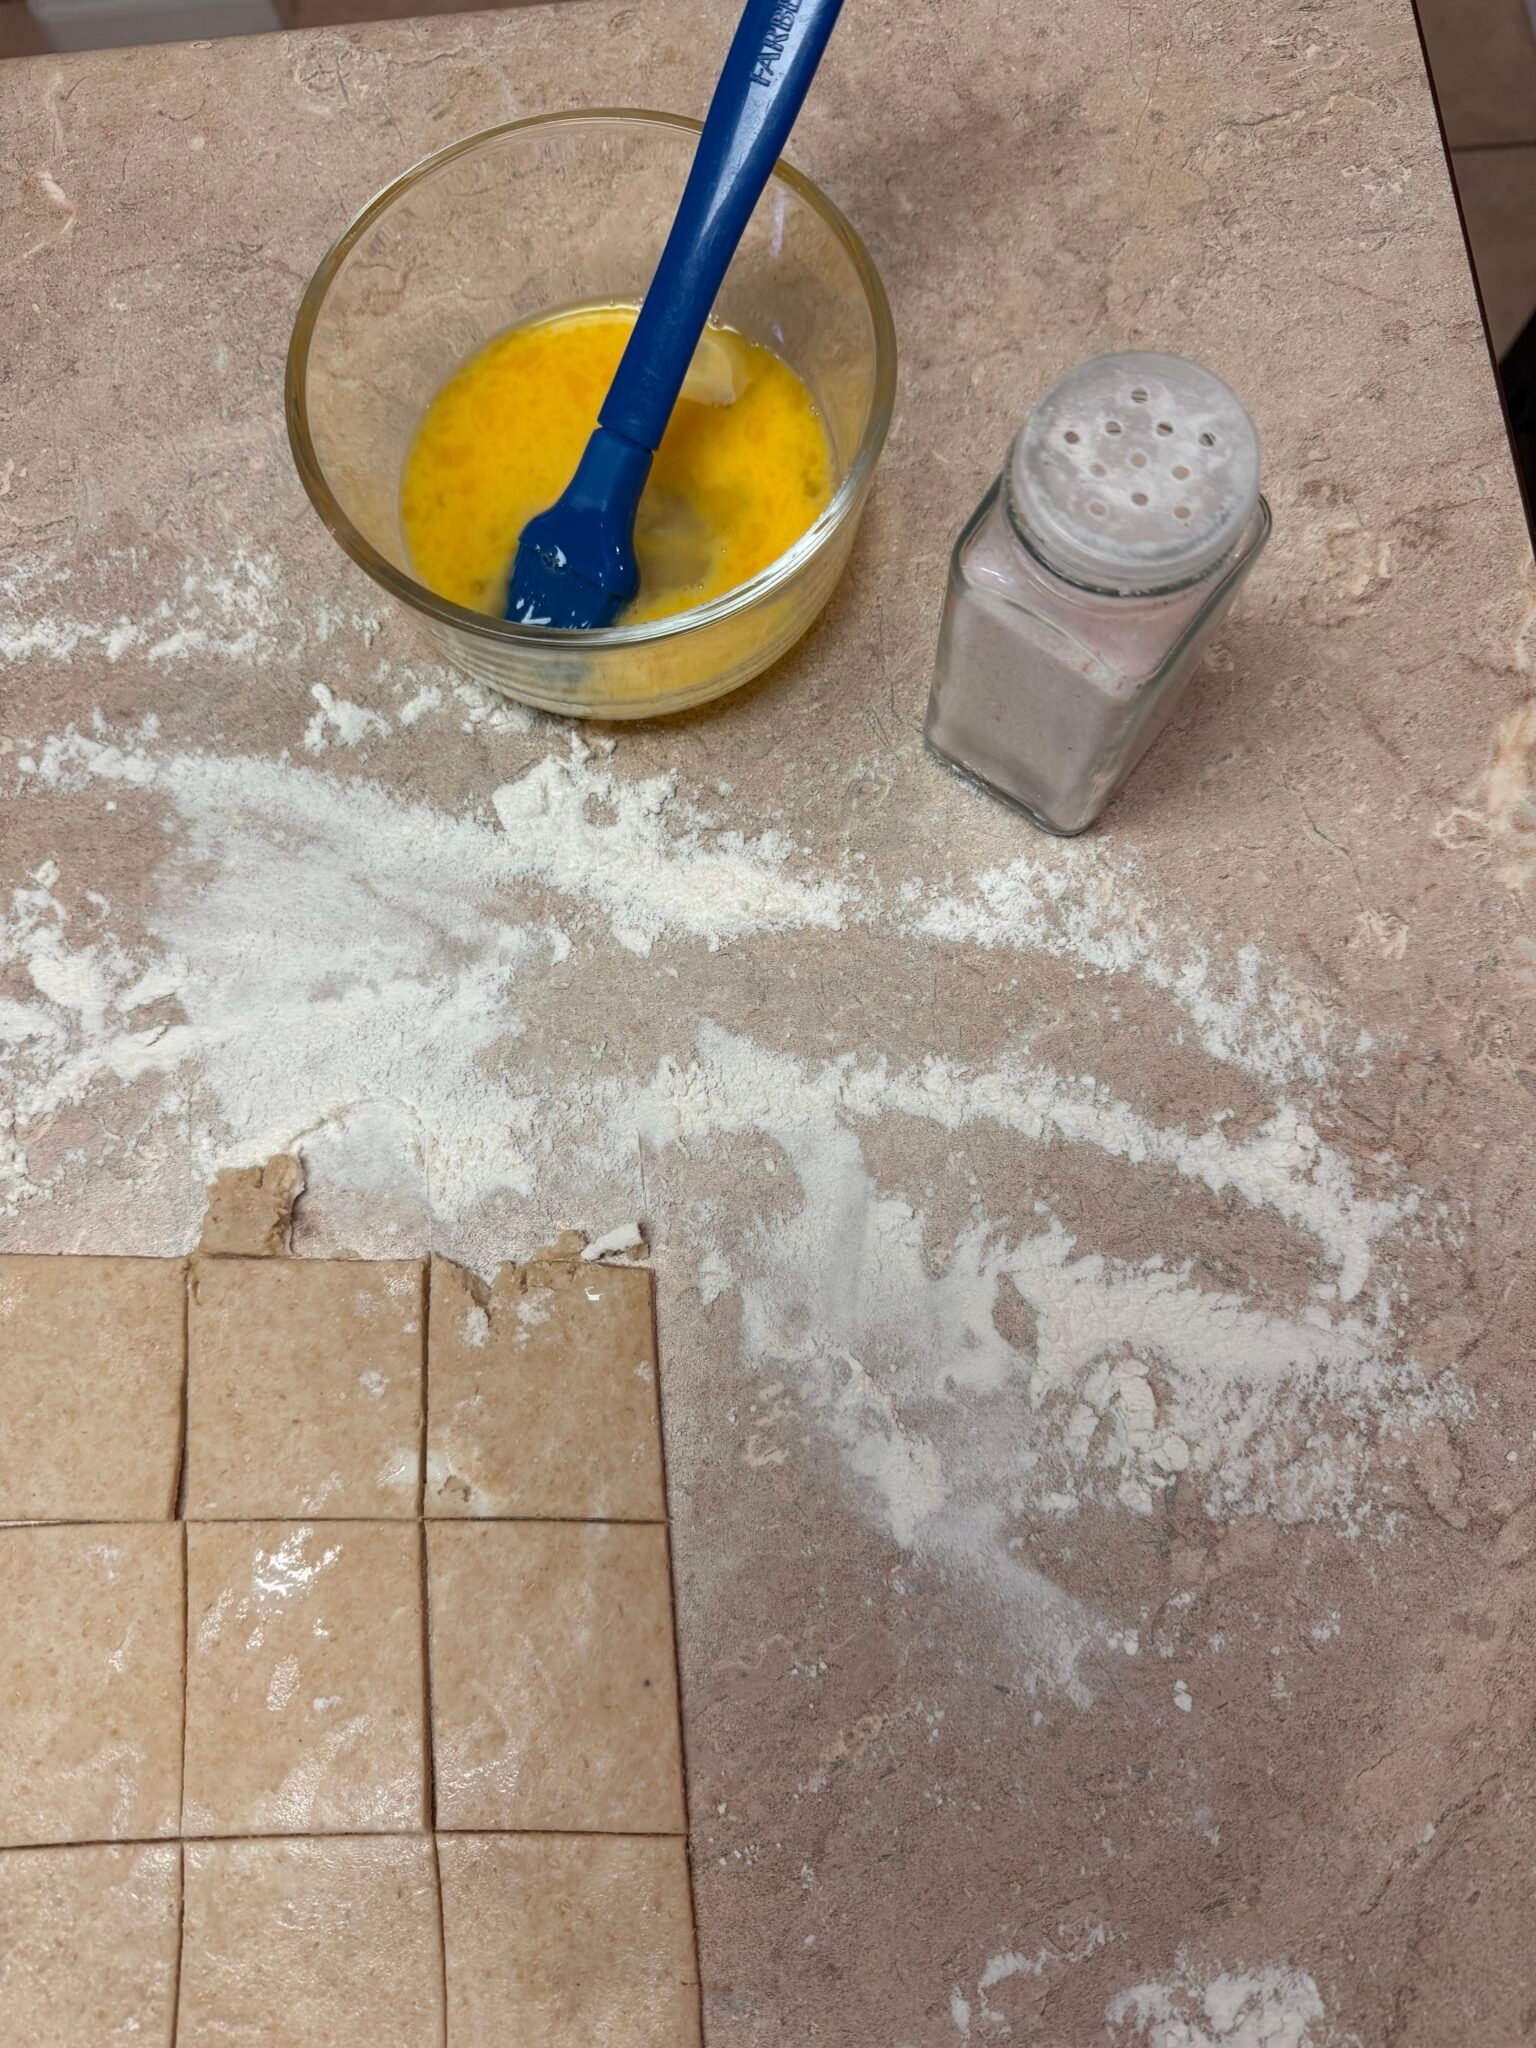
- Roll and Cut: Flour your work surface and cut off ⅓ of the dough, keeping the rest in the fridge. Roll the dough as thin as possible — nearly paper thin! Use a 1½ inch circle cutter to cut rounds, or cut into squares with a knife or pizza cutter.
- Prep for Baking: Arrange the crackers close together on the prepared baking sheet — they don’t spread. Brush each one with egg wash, then use a fork to poke three rows of holes into each cracker. Sprinkle generously with flaky salt.
- Bake to Golden Perfection: Bake for 10–14 minutes until the crackers begin to turn golden brown around the edges. Watch them closely — thin crackers can go from golden to overdone very quickly!
- Brush with Butter and Cool: Remove from the oven and immediately brush with melted butter. Let them cool on the pan — they’ll crisp up even more as they cool.
- Repeat with Remaining Dough: Roll out, cut, and bake the remaining dough in batches. Always keep the dough you aren’t working with in the fridge to stay cold between batches until all the dough is used up.
Ashley’s Pro-Tips for the Best Wheat Thins
Keep everything cold. I cannot stress this enough — cold butter, cold dough, and keeping the remaining dough in the fridge between rolling sessions is what gives you those wonderfully crispy, flaky crackers. If your kitchen is warm, chill your mixing bowl too. This step is truly non-negotiable!
Roll thin — thinner than you think. The thinner you roll, the crispier your crackers will be. Aim for almost-translucent thinness. I know it feels a little daring, but trust me — a thicker cracker just won’t have that satisfying snap. If the dough tears a bit, press it back together and keep going. Imperfectly perfect crackers taste just as delicious!
Use maple sugar if you have it. Swapping regular sugar for maple sugar adds a beautiful, subtle sweetness and a tiny hint of warmth to the crackers. It’s such a small amount but it makes a noticeable difference in flavor, especially paired with freshly milled wheat flour. Totally worth it if you have it on hand!
Poke those holes! Using a fork to poke three rows of holes into each cracker isn’t just for aesthetics — it prevents the crackers from puffing up unevenly in the oven. Even, flat crackers crisp up better and look much more polished. This is my favorite step because it’s weirdly satisfying — this step is non-negotiable!
Watch the bake time closely. Every oven is a little different, and thin crackers bake fast. Start checking at the 10-minute mark. You want golden edges and a lightly golden top — not dark brown. Pull them a touch early if needed, because they will continue to crisp up as they cool on the pan. Future-you will thank you for the patience!
Storage & Make-Ahead
Once fully cooled, store your wheat thins in an airtight container at room temperature for up to 5 days. They stay wonderfully crispy and are perfect for snacking all week long. Just make sure they’re completely cool before sealing them up — any residual warmth creates condensation and will soften your beautiful crispy crackers.
These crackers also freeze beautifully after baking! Layer them between sheets of parchment paper in a freezer-safe container and freeze for up to 2 months. Let them come to room temperature before serving, and if they need a little re-crisping, pop them in a 300°F oven for 5 minutes — good as new!
For make-ahead magic, the raw dough can be wrapped tightly and refrigerated for up to 3 days or frozen for up to 1 month. Thaw frozen dough in the fridge overnight, then roll and bake as directed. This is perfect for prepping ahead of a party — just imagine pulling fresh-baked crackers out of the oven while your guests arrive. Future-you will be so grateful!
A Little Joy on Top
These fresh milled flour wheat thins are honestly one of my favorite things to pull out when we have guests over — they look so artisan and impressive, but only we know how simple they actually were to make! I love arranging them on a big wooden board with sharp cheddar, sliced prosciutto, a drizzle of honey, and a little bowl of fresh fruit. They disappear so fast every single time, and someone always asks for the recipe.
For a snack that feels extra special, try serving these alongside a jar of warm homemade apple butter — that combination is absolutely dreamy. My Easy Slow Cooker Homemade Apple Butter is made right in your Crockpot with zero fussing, and the warm cinnamon-apple flavor paired with these buttery wheat thins is a match made in snack heaven!
If you love from-scratch baking as much as I do, you are going to want to check out my Easy Fluffy Sourdough German Pancakes — another beautiful way to bake with wholesome, real ingredients and end up with something that tastes genuinely special. And for a crowd-pleasing treat that uses pantry staples just like these crackers, my Easy Homemade Brownies are always a hit with the whole family!
Making food from scratch — especially with freshly milled flour — feels like such a meaningful gift you give your family. There’s something so special about knowing exactly what went into what they’re eating, and watching them reach for ‘just one more’ cracker is all the reward I need. Happy baking, friends — you’ve absolutely got this! — Ashley
Want to Save This Recipe?
Enter your email below, and we’ll send the link straight to your inbox.
Fresh Milled Flour Wheat Thins Recipe
Ingredients
Method
- In a medium bowl, combine the freshly milled soft white wheat flour, baking powder, sugar, and salt. Whisk until evenly combined.
- Add the cold, cubed butter to the flour mixture. Use a pastry cutter or fork to cut the butter into the flour until the mixture resembles small peas. Work quickly to keep the butter cold.
- Add ⅓ cup water and mix together. If needed, add the remaining 2 tablespoons water a little at a time. The dough should be wet and cohesive but not sticky. There should be no dry flour remaining.
- Shape the dough into a disc and wrap tightly in plastic wrap. Refrigerate for 1–2 hours until cold and noticeably firmer.
- When ready to bake, preheat the oven to 400°F and line a baking sheet with parchment paper.
- Flour a work surface and cut ⅓ of the dough off. Return the remaining dough to the fridge. Roll the dough out as thin as possible — nearly paper thin. Use a 1½ inch circle cutter to cut rounds, or cut into squares with a knife or pizza cutter.
- Arrange the crackers close together on the prepared baking sheet (they do not spread). Brush each cracker with egg wash, then use a fork to poke three rows of holes into each one. Sprinkle with a little salt.
- Bake for 10–14 minutes until the crackers begin to turn golden brown around the edges. Watch them closely — thin crackers bake fast!
- Remove from the oven and immediately brush with melted butter. Allow to cool on the pan — they will crisp up further as they cool.
- Repeat with the remaining dough, rolling, cutting, and baking in batches. Keep the dough you are not working with in the fridge to stay cold between batches.
Tried this recipe?
Let us know how it was!
Meet Ashleybakeseasy
Welcome to Ashley Bakes Easy! I’m Ashley, a home cook and mother who believes that delicious food doesn’t have to be complicated. My journey in the kitchen started with a simple goal: create meals that my whole family would love, we could afford on a single income, and create recipes tailored for our special needs son Winston.
LET’S CONNECT!

Hello Form Ashleybakeseasy
Welcome to Ashley Bakes Easy! I’m Ashley, a home cook and mother who believes that delicious food doesn’t have to be complicated. My journey in the kitchen started with a simple goal: create meals that my whole family would love, we could afford on a single income, and create recipes tailored for our special needs son Winston.
Leave a Reply